
Before you start
- A cPanel (or similar) hosting account with your domain connected
- PHP 8.2+ available in MultiPHP / Select PHP Version
- MySQL or MariaDB
- Your FaithCode package
.zip - Your Envato purchase code for the base FaithCode product, and a browser that can open verifier.faithcode.tech
Create the MySQL database
Create an empty database before you open the Setup Wizard. You will type these details into the wizard later.
-
Open MySQL® Databases
In cPanel search for MySQL® Databases (or MySQL Database Wizard).
-
Create database + user
Create a database (example name ends with
_faithcode). Create a user with a strong password. Add the user to the database with ALL PRIVILEGES. -
Write down
Hostlocalhost(unless your host shows another DB host)Database namefull name including prefix (e.g.user_faithcode)Usernamefull MySQL usernamePasswordthe password you set
Select PHP 8.2+ and extensions
In cPanel → Select PHP Version (or MultiPHP Manager), choose PHP 8.2+ and enable:
pdo_mysql, mbstring, openssl, tokenizer, xml, ctype, json, bcmath, fileinfo, gd or imagick, curl, zip
Upload the package zip, then extract it
-
Open File Manager
cPanel → under Files, click File Manager.
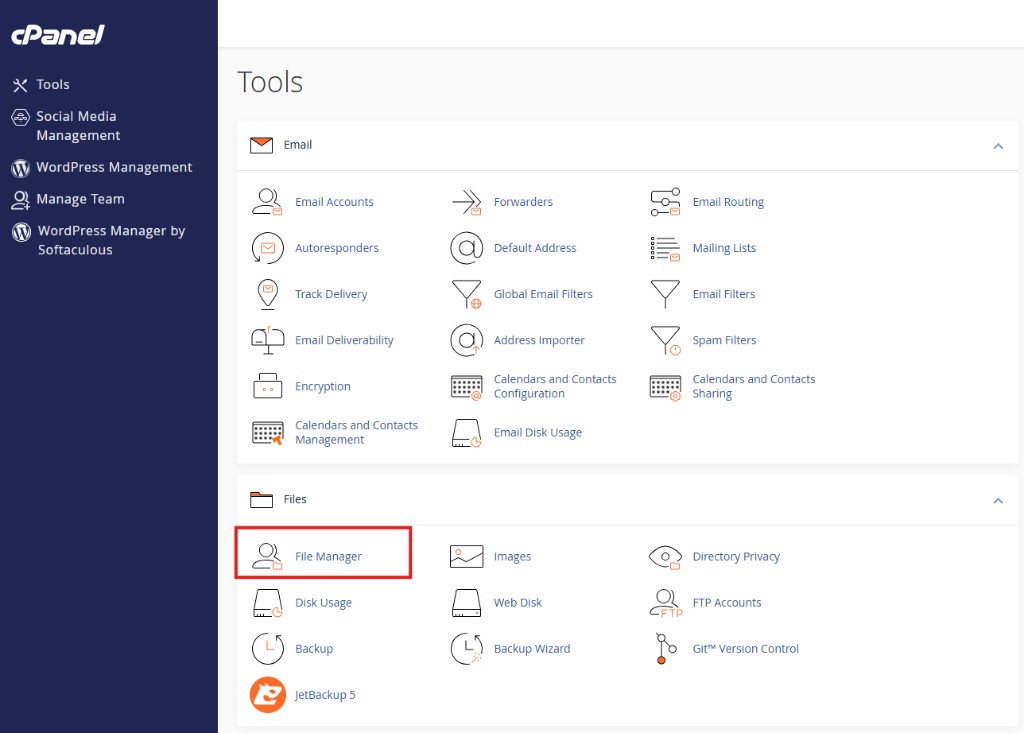
cPanel → Files → File Manager -
Open your website folder
- Main domain — usually
public_html - Addon domain — often a folder named like the domain
- Subdomain — the folder you chose when creating it
- Main domain — usually
-
Upload
Toolbar → Upload → choose your FaithCode
.zip→ wait for 100%. Go back to the folder so the zip appears in the list.Large zips can time out — use FTP if the browser upload fails. -
Extract
Select the zip → Extract into the same folder. You should see
app,bootstrap,public,storage,vendor,artisan,.env: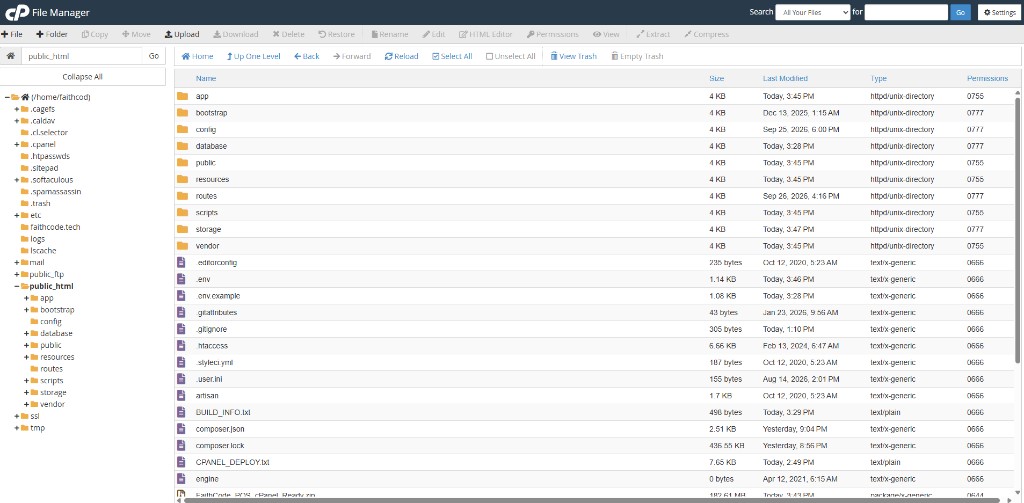
After extract in public_html— note Upload / Extract and the Permissions columnAvoid a nested folder. If files landed insideFaithCode_POS_…/, move them up sopublic,storage, andartisansit in the domain folder.Delete the zip after a successful extract if you want to free space.
Point the domain to public
Laravel’s web entry is the public folder. Use one method:
Method A — Change document root (recommended)
cPanel → Domains / Addon Domains / Subdomains → set Document Root to the FaithCode public folder, for example:
/home/YOURUSER/public_html/public/home/YOURUSER/yourdomain.com/publicMethod B — Root .htaccess
If you cannot change the document root, keep the domain on the app folder. The package’s root .htaccess forwards traffic into public.
Make storage and bootstrap/cache writable
These folders sit next to artisan (not inside public). Use File Manager. You do not open Terminal for a first install.
Select storage and bootstrap/cache → Permissions → enable write (often 755 or 775) and apply to subfolders when the dialog offers it.
Open your domain
DNS_PROBE_FINISHED_NXDOMAIN or “This site can’t be reached”,
that is a DNS / domain problem — not permissions and not the .env database.
Fix DNS first (below), then open the site.
-
Confirm the domain is connected in cPanel
cPanel → Domains (or Addon Domains). Your domain (example:
yourdomain.com) must be listed and its document root must be the FaithCode folder (or…/public).If you only uploaded files into
public_htmlbut the domain was never added / pointed here, the browser cannot find the site. -
Point DNS at your host
At your domain registrar (where you bought the domain), set nameservers to the ones your hosting company gave you (often like
ns1.….com/ns2.….com), or create an A record to the server IP shown in cPanel.DNS can take from a few minutes up to 24–48 hours. Until it works,
faithcodeph.tech-style errors mean the name does not resolve yet.Double-check spelling.faithcodeph.techandfaithcode.techare different domains — use the exact domain you registered and added in cPanel. -
Test while DNS is pending (optional)
Use your host’s temporary URL if they provide one, or open the site from File Manager preview if available. Editing
.envDB settings alone will not fix NXDOMAIN. -
Enable HTTPS
After the domain resolves, use SSL/TLS or Let’s Encrypt / AutoSSL so the site opens as
https://your-domain.com. -
Visit the site
Open your domain. You should land on the Setup Wizard. If not, try
https://your-domain.com/setup.Prefer completing Setup in the browser. You can also put DB details in
.env— see APP_URL + database. The wizard is the supported path for a fresh install.
public ·
storage + bootstrap/cache writable → open domain → Setup Wizard.
Website address (APP_URL) and database — explained simply
On hosting, FaithCode still uses a private settings file named .env
(same folder as artisan). Two lines matter most after your domain works:
your live website address (APP_URL) and
your MySQL login (DB_*).
.env.
Read this section so you know what each value means, and so you can fix a wrong URL or password later.
How to open .env in cPanel
-
File Manager
cPanel → File Manager → open the folder that contains
artisan(oftenpublic_htmlor your domain folder — not only insidepublic). -
Show hidden files
Settings (top right in File Manager) → enable Show Hidden Files (dotfiles) → Save. You should see
.env. -
Edit carefully
Right-click
.env→ Edit. Change only the lines you need. Save. Do not delete random lines you do not understand.
.env in a public ticket, Facebook group, or CodeCanyon comment.
It can contain your database password and other secrets.
Website address — APP_URL (cPanel / live)
Set this to the same address customers (and you) use in the browser,
almost always with https:// after SSL is working.
| How the site should open | Set APP_URL to |
|---|---|
| Main domain with SSL | https://your-domain.com |
| www version (only if that is what you always use) | https://www.your-domain.com |
| Subdomain | https://shop.your-domain.com |
| Still on plain HTTP (temporary) | http://your-domain.com — switch to https when SSL is ready |
APP_URL=https://your-domain.com- Match https vs http to what the browser address bar shows.
- Match www vs no-www the same way (pick one and stick to it).
- Do not add a trailing slash:
https://your-domain.com✓ ·https://your-domain.com/✗ - Do not use
http://127.0.0.1:8000on a live server — that is only for local PC testing (local guide). - Wrong
APP_URLoften causes missing CSS/JS or broken login redirects after install.
Database settings — DB_* (cPanel)
Use the full names from cPanel → MySQL® Databases
(hosts usually add a prefix like youruser_ in front of the name you typed).
mysqllocalhost (use the host your cPanel shows if different)3306 unless your host says otherwiseyouruser_faithcodeyouruser_fcuserDB_CONNECTION=mysql
DB_HOST=localhost
DB_PORT=3306
DB_DATABASE=youruser_faithcode
DB_USERNAME=youruser_fcuser
DB_PASSWORD=your-strong-passwordfaithcode when cPanel really created
youruser_faithcode. Always copy the full name from the MySQL Databases page.
Example live block (copy & replace with your values)
APP_ENV=production
APP_DEBUG=false
APP_URL=https://your-domain.com
DB_CONNECTION=mysql
DB_HOST=localhost
DB_PORT=3306
DB_DATABASE=youruser_faithcode
DB_USERNAME=youruser_fcuser
DB_PASSWORD=your-strong-password
SESSION_SECURE_COOKIE=false
Keep SESSION_SECURE_COOKIE=false until the site opens cleanly on HTTPS.
After SSL works everywhere, many hosts are fine leaving it false in FaithCode packages;
do not set it to true while you still open the site with plain http://.
.env by hand, and do not run a migrate command.
Open /setup and let the wizard save them.
Setup Wizard vs editing .env
| Situation | What to do |
|---|---|
| Brand-new install | Open /setup. Paste the product key, then finish every step. |
| Installed, but styles/links wrong | In File Manager, set APP_URL to the exact browser address, save, and refresh. |
| Database error after install | Fix the full DB_* names and password in .env, save, and refresh. |
| You changed the MySQL password in cPanel | Update DB_PASSWORD in .env to match, then refresh. |
| Domain does not open at all (NXDOMAIN) | Fix DNS first — .env cannot fix a domain that does not resolve |
Setup Wizard — required for every buyer
Open https://your-domain.com/setup. There is no way to skip the product key.
This is the same page for a base package without add-ons and a base package with add-ons already inside.
The pictures below are the real Setup pages. Follow them in order. The same five steps are required for the cPanel package, the base without add-ons, and the base with add-ons.
-
1 · License
Do not paste the CodeCanyon purchase code on this page. Open verifier.faithcode.tech, paste the base FaithCode purchase code from CodeCanyon → Downloads → License certificate, and enter this website’s domain (for example faithcode.tech, without
https://). Complete the Google captcha, then copy the product key. It looks likeFC-2345-ABCD-EFGH-JKLM-NPQR-STUV. Paste that key here, tick the confirmation, then Verify & continue. The key works once, and only on this website.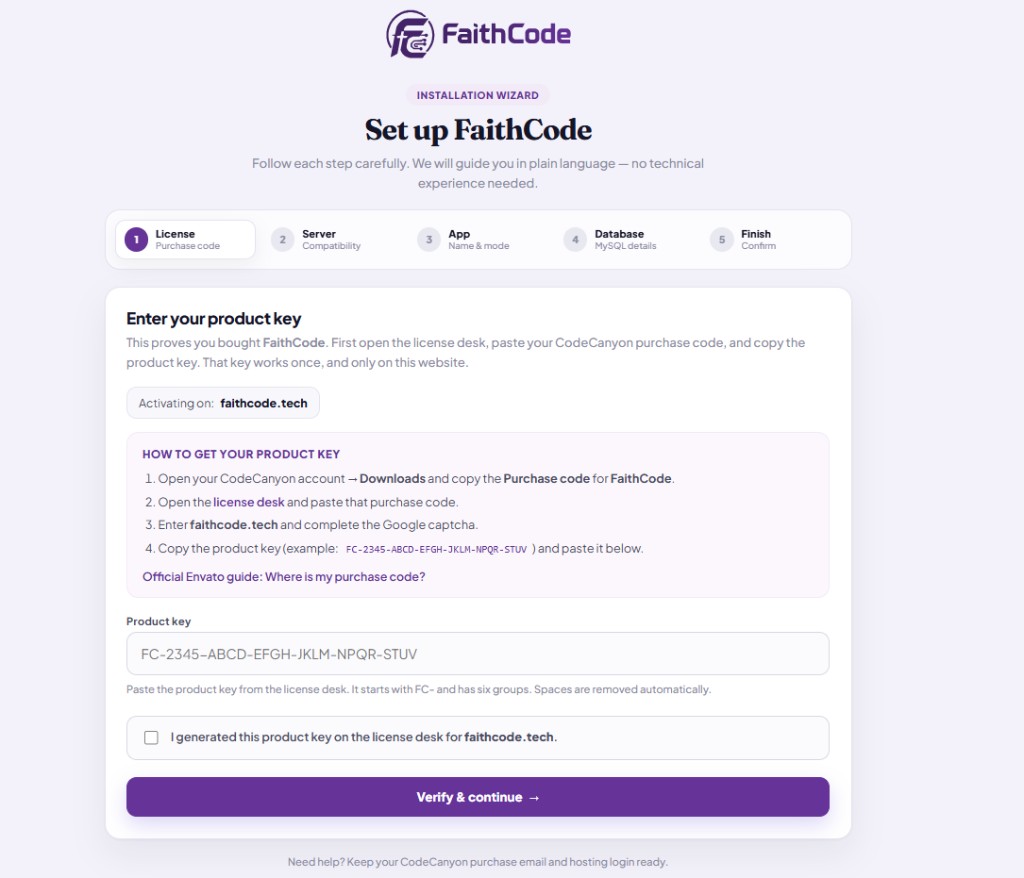
Step 1 — License. Paste the product key, tick the box for this domain, then Verify & continue. On a brand-new empty database you will not see the extra lines in this picture. Those lines appear only when tables already exist: continuing verifies the code and keeps your data. Open Advanced: start fresh only when you intend to delete everything in that database. -
2 · Server
Every row should say Ready. If one is red, enable that PHP extension in Select PHP Version and refresh this page.
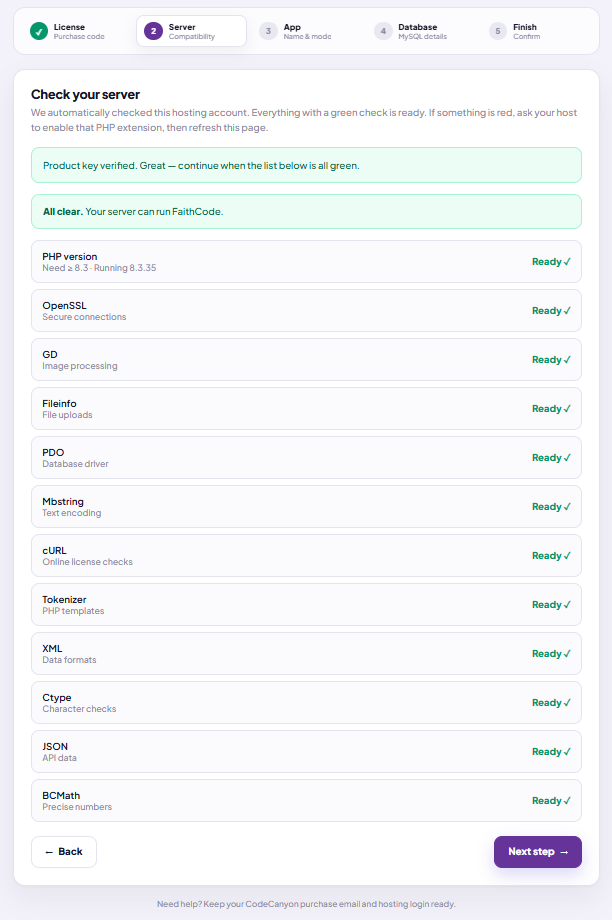
Step 2 — Server. Continue only when every check is green. -
3 · App
Type the name shown in the browser tab. On a live site choose Production and set detailed errors to No. Leave the security key as the page shows it. That key belongs to this install — do not publish it.
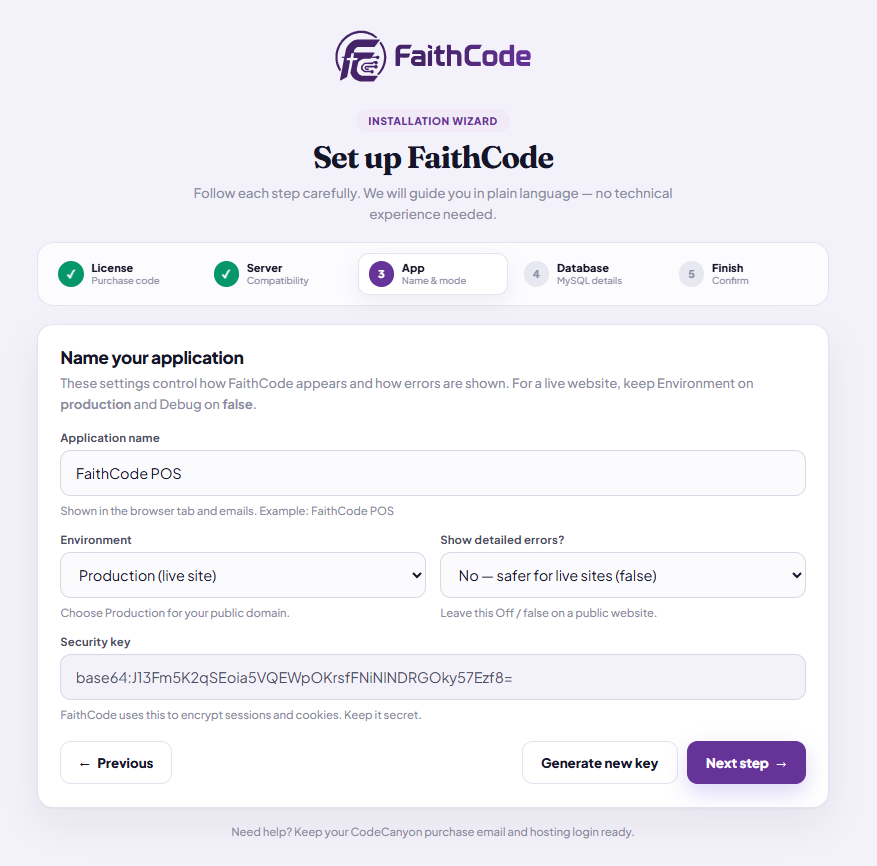
Step 3 — App. Production and errors off for a public website. -
4 · Database
Create the empty MySQL database in cPanel first. Then enter host (often
localhost), port3306, the full database name and username (cPanel often adds a prefix), and the password. Click Test connection. Next step stays locked until the button turns green. This does not create tables yet.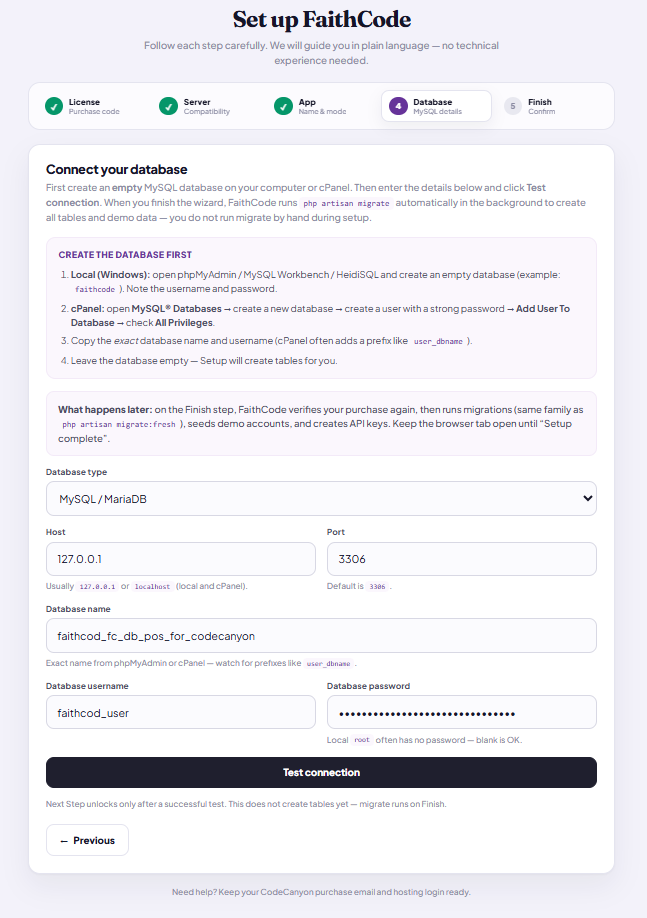
Step 4 — Database. Enter the exact cPanel names, then Test connection. 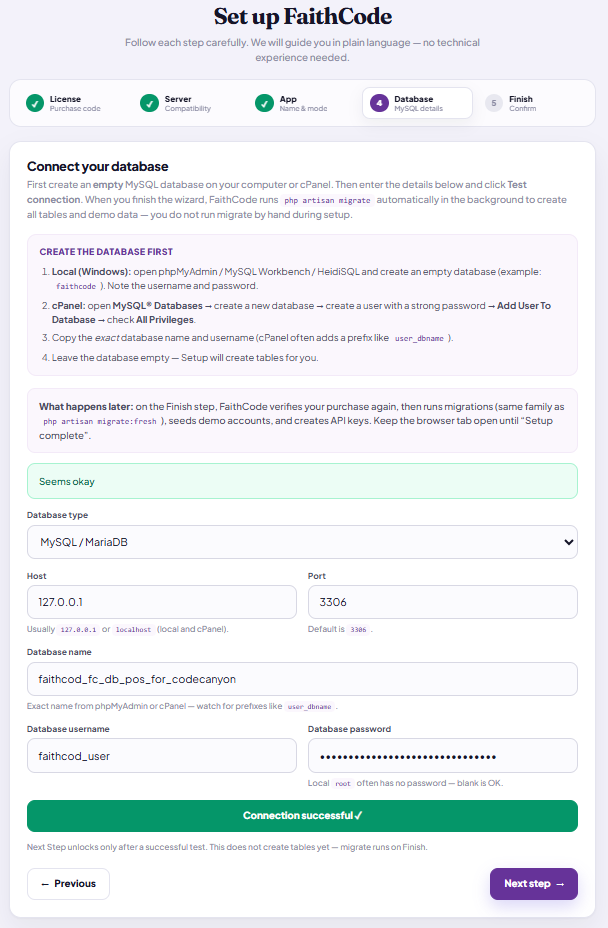
When the button says Connection successful, Next step unlocks. Tables are still not created. -
5 · Finish
Tick the confirmation, then Confirm & install. Keep the tab open until setup completes. FaithCode checks the product key again, creates the tables, loads demo logins, creates the API keys, and links storage. You do not run migrate yourself.
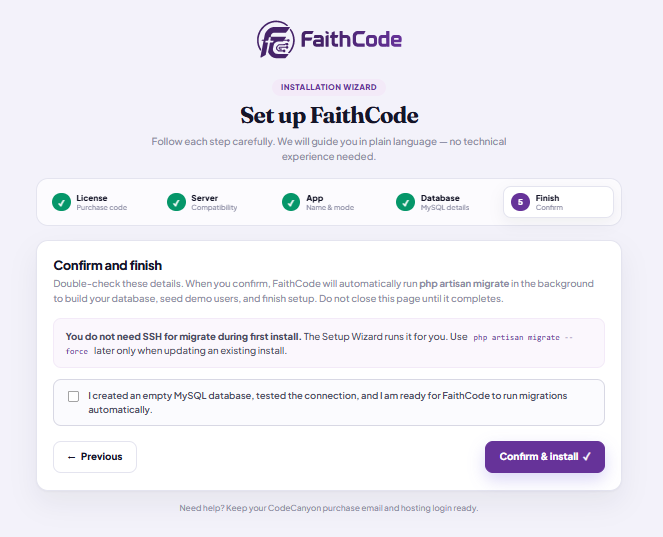
Step 5 — Finish. Tick the box, then Confirm & install. 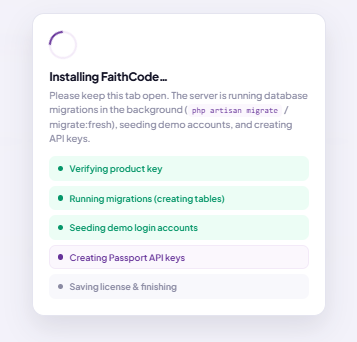
Keep this tab open while FaithCode installs. 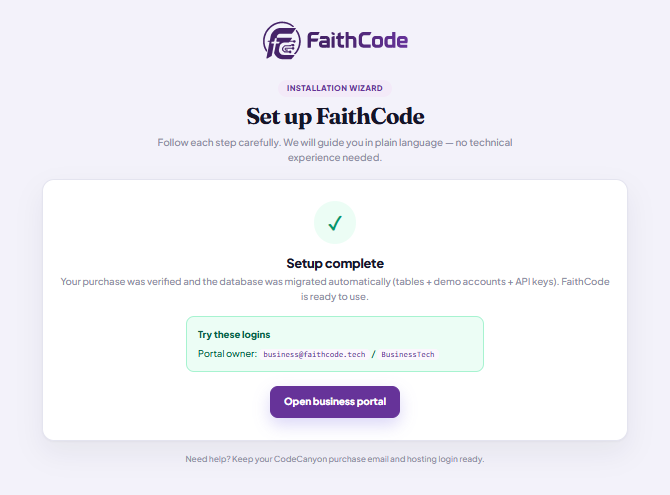
Setup complete. Sign in with the portal owner shown on the page: business@faithcode.tech / BusinessTech.
Product key (required)
CodeCanyon → Downloads → FaithCode (the base product) → License certificate, and copy the purchase code. On verifier.faithcode.tech, paste that code, enter your live domain, complete the captcha, and copy the product key. Paste the key into step 1 of Setup. A key looks like FC-2345-ABCD-EFGH-JKLM-NPQR-STUV and works once, on that domain only.
Use a key from the base purchase whether your zip is base without add-ons or base with add-ons. A key from a different product will not pass. One purchase also allows one local computer. Installing on localhost does not replace this live domain, and this live domain does not replace localhost.
If verification fails: use the product key, not the purchase code. Confirm the domain on the license desk matches the site you are installing, and confirm this server can reach https://verifier.faithcode.tech.
After install
- Log in with a demo account (created during Finish)
- Change demo passwords before real shop use
- Add the cron job below
- Optional: AI product images
- Optional add-ons later: see Optional add-ons (full guide: Add-ons)
- Phone app later? → Mobile guide (use your HTTPS domain in API Configuration)
Demo accounts (default seed data)
Setup runs migrations and loads default seed accounts automatically. Sign in with email + password. Full copy also on the buyer web-install page.
| Where | Role | Username | Password | |
|---|---|---|---|---|
/login |
Owner | business_owner |
business@faithcode.tech |
BusinessTech |
/login |
Staff | business_staff |
businessStaff@faithcode.tech |
BusinessStaff |
/login |
Cashier | business_cashier |
businessCashier@faithcode.tech |
businessCashier |
/super-admin/login |
Super Admin | — | admin@faithcode.tech |
AdminTech |
Add-ons
Finish Setup with the base product key first. Then:
- Base with add-ons — Super Admin and Mobile are already in the zip. Do not open
/addonsand do not upload those zips again. After Setup, use/super-admin/loginand the business/login. - Base without add-ons — log in, open System Settings → Add-ons Import Zip (or
https://your-domain.com/addons), and upload each add-on zip together with a product key for that add-on. On the license desk, use that add-on’s purchase code and this same live domain. The base key does not unlock an add-on. The mobile zip installs the server API only. It does not include the Flutter app folder.
Full steps: Add-ons (Local + cPanel).
Scheduler (cron)
cPanel → Cron Jobs → once per minute:
* * * * * cd /home/YOURUSER/public_html && php artisan schedule:run >> /dev/null 2>&1Replace the path with your real FaithCode app folder (where artisan lives).
Optional AI product images
This is a Super Admin setting. There is no BFL line in .env. The key is saved encrypted in the database from this page only.
Super Admin must already be installed. Sign in at /super-admin/login, then open Settings → Product Image AI.
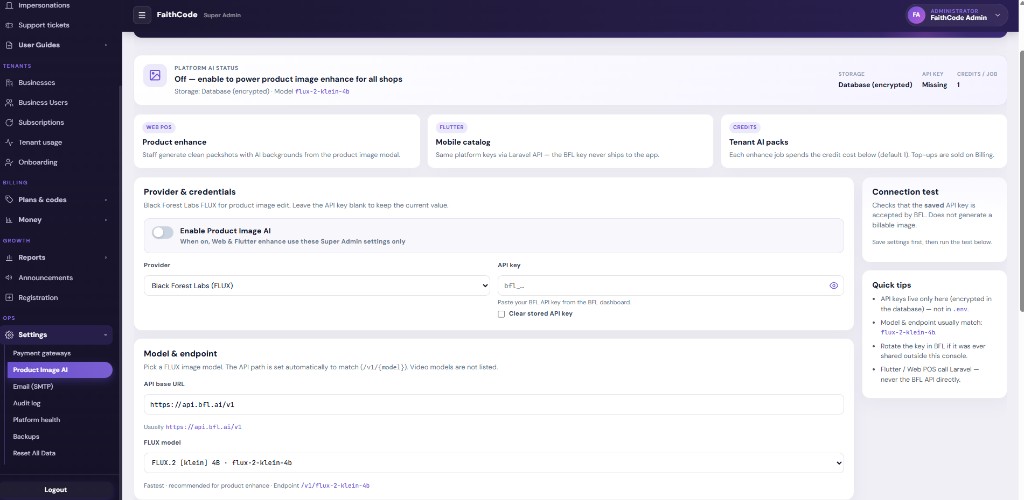
Turn it on
Switch on Enable Product Image AI. Leave the provider on Black Forest Labs (FLUX).
Paste your key
Copy the key from the BFL dashboard. It starts with
bfl_. Paste it in API key. Leave API base URL ashttps://api.bfl.ai/v1unless BFL gave you a different address. Pick the FLUX model. FLUX.2 [klein] 4B is the usual choice.Keep SSL on
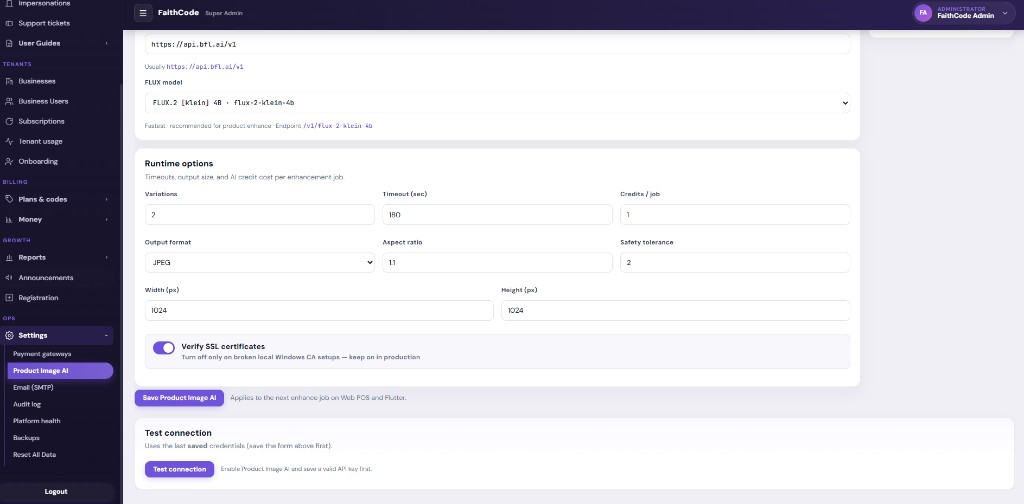
Leave Verify SSL certificates on for a live cPanel site.
Save, then test
Click Save Product Image AI. Then click Test connection. The test uses the saved key, so save first. A blank key box on a later visit is normal: the stored key stays until you tick Clear stored API key.
Troubleshooting (cPanel)
| Problem | Fix |
|---|---|
| Blank page / 500 | Check storage/logs, permissions, and document root → public |
“This site can’t be reached” / DNS_PROBE_FINISHED_NXDOMAIN | Domain DNS not set or not propagated. Add domain in cPanel; set nameservers or A record at the registrar. Not fixed by .env or chmod. |
| storage not writable | In File Manager, set storage and bootstrap/cache writable, then open /setup again. |
| Database error | Use the full cPanel DB name and user (with prefix). Host is often localhost. Test again on the Database step. |
| Product key rejected | Paste the product key (FC-…), not the purchase code. The domain on verifier.faithcode.tech must match this website. The server must reach that license desk over HTTPS. An add-on key will not pass the base Setup page. |
| CSS/JS missing or odd redirects | APP_URL must match the real browser URL (https://…, with or without www). Save .env in File Manager and refresh. |
| Setup stopped before Finish | Go back to /setup and complete License → Server → App → Database → Finish. Do not create tables by hand. |